

Making Small-Scale (3-6mm) Woods
- Mike at SBS
- Feb 6, 2022
- 3 min read

When I set about to create some battle reports for Dawn of Iron, I realized quickly that I don't have a lot of terrain to use with 3-6mm scale miniatures. So I decided to correct this and start with some woods since they are generally ubiquitous for all North American riverine scenes.
Supplies
For this project, you'll need
A pile of discarded supports from a 3D printer (without rafts)
Sprue Cutters/Clippers
Chocolate Brown Paint
Medium Grey Paint
Medium Paintbrush (for painting/drybrushing tree trunks)
Large Brush (for applying PVA glue to foliage)
Clump Foliage (Woodland Scenics or make your own)
Hot Glue Gun
PVA Glue
Paints that match your basing style

I've had this idea to recycle my 3D printing resin support sprues for a while. I've managed to accumulate quite a pile of these support bases and I wanted to use them rather than throwing them away. If you don't have your own supply of these, ask around because I'm sure someone in your gaming circle has a pile building up! Just make sure that they don't have rafts because these have a lip around the edge that might not work for you.
Note: Make sure that the supports are all well cured. If they're not, or you're not sure, just put them out in the sunlight for a few hours.

The bases and vertical supports lent themselves to trunks and I had a pile of home-made foliage leftover from by old Bocage project. I thought I had done a tutorial for how I made my own foliage, but apparently I didn't or at least I can't find it. In any case, I used this method by the Terrain Tutor.
Step 1: Trim Supports
The first thing you need to do is trim all the supports to your desired height. As you can see, I varied the height trying to get some tall trees as well as some bush-sized ones.
Note: If the base is a little bent, you can pour some boiling water over it, which will make it flexible. Bend and hold it in the shape you want and then let it cool down. It should retain the new shape.
Step 2: Paint the Bases

I used a cheap brown paint for the basecoat followed by a medium grey drybrush, just around the trunks on the outward facing sides of the base. I ended up doing the drybrush at the end but I could have done it here instead.
You could also paint the bases to match your table or miniatures at this phase as well. Again, I did this at the end, but you can do it here if you want to. In either case, you probably don't need to do the interior of the base.
Step 3: Apply Foliage

Next I used the hot glue gun to put beads of glue on the tops of the trunks and then quickly (before it drips down to the base) applied a blob of foliage. It'll feel loose, but as long as its not coming off entirely, its fine for now. Apply more glue if you feel the need to add more.
Note: I used several shades of green and mixing these is a bit like painting without the paint. So mix the colors (or not) as you see fit.
Step 4: Harden Up the Foliage

Once you're happy with the shapes of the pieces, use a large brush and apply a couple of heavy coats of watered down (50/50) PVA to the foliage. Put them in the sun or let them sit over night. This will harden the foliage and make them more durable. You might need to spot-glue a few bits that fall off.
Step 5: Clean Up

After the glue is dried, pick out any hot glue hairs that are clinging on. At this point I pained my bases to help cover up the glossy PVA drips that dried on the base. I also dry brushed the grey on the trunks at this point.
That's it! You might want to seal them with a finish, but I didn't bother as the PVA will make them fairly durable.

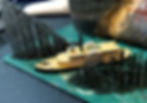
Above: The Carondelet investigates the riverside for rebs. I tried to blend the base colors to match my fabric river mat, so I used some khakis and sand colors to do the job.

Above: That's my first batch. I'm thinking I may need another to get a good coverage on my 3x3 table.

Above: I did several small ones to use as scatter terrain or, as shown here, small islands in the band of a river.
Hope that's useful! I've got a few more ideas for the support bases, so stay tuned!
Cheers,
Mike